Antillery Devlog #5
Flexible Scene Management with State Machines
May 27, 2025
Building a robust application flow architecture with ScriptableObjects and configurable scene loading
Architecture Overview
This week I implemented a complete game flow architecture for Antillery that handles state transitions, scene management, and UI events in a decoupled, data-driven way with a strong focus on designer empowerment.
Design Goals
- Create a designer-friendly system that requires zero coding to customize game flow
- Support both scene replacement and additive scene loading based on state requirements
- Make state transitions configurable entirely through the Unity inspector
- Ensure all configuration is done via inspector-friendly ScriptableObjects
- Enable designers to create and modify application flow without programmer involvement
The architecture consists of three main subsystems: a state machine core, a flexible scene manager, and custom editor extensions designed to be accessible to non-programmers.
State Machine Core
At the heart of the architecture is a ScriptableObject-driven state machine that manages the game flow using events and transitions.
Core Components
- State: ScriptableObject that serves as a marker for application states
- StateMachine: MonoBehaviour that manages transitions between states and listens for trigger events
- GameEvent: ScriptableObject that serves as a decoupled messaging system
- StateTransition: Data structure connecting trigger events to destination states
- PreserveGameFlowManager: Keeps the state machine alive between scenes
- AddressableSceneDriver: Maps states to scenes with configurable loading behavior
How It Works
The StateMachine maintains a current state and a list of possible transitions. Each transition connects an event trigger to a destination state. When a GameEvent is raised, the StateMachine checks if that event should trigger a state transition, and if so, it changes to the new state.
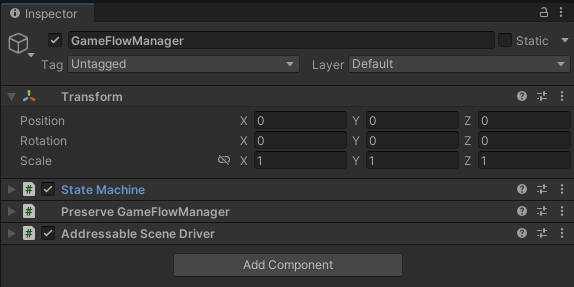
The GameFlowManager GameObject hosts both the StateMachine and AddressableSceneDriver components and persists across scene loads.
GameFlowManager: The Persistent Core
A crucial aspect of this architecture is the GameFlowManager GameObject, which is marked with DontDestroyOnLoad to persist throughout the entire application lifecycle. This GameObject hosts both the StateMachine and AddressableSceneDriver components, ensuring the state machine remains active even as scenes change. The PreserveGameFlowManager component is responsible for keeping this GameObject alive across scene transitions, maintaining the application's state regardless of what scene is currently loaded.
[CreateAssetMenu(menuName = "State Machine/State")]
public class State : ScriptableObject
{
    [Tooltip("Transitions from this state: on triggerEvent, go to nextState.")]
    public List transitions = new List();

    [Header("State Callbacks")]
    public UnityEvent OnEnter;
    public UnityEvent OnExit;
} public class StateMachine : MonoBehaviour
{
[Tooltip("Initial state to start in.")]
public State initialState;
private State currentState;
private readonly List activeTransitions = new List();
private readonly Dictionary callbacks =
new Dictionary();
private void Start()
{
if (initialState != null)
GoToState(initialState);
}
public void GoToState(State newState)
{
if (currentState != null)
{
currentState.OnExit?.Invoke();
UnregisterCurrentTransitions();
}
currentState = newState;
currentState.OnEnter?.Invoke();
RegisterTransitions();
}
private void RegisterTransitions()
{
foreach (var t in currentState.transitions)
{
Action callback = () => OnTransitionTriggered(t);
callbacks[t] = callback;
t.triggerEvent.RegisterListener(callback);
activeTransitions.Add(t);
}
}
} Design Note: The beauty of this system is its simplicity - states are just markers, with the actual behavior defined by what listens to the OnEnter/OnExit events and what triggers state transitions. This creates a highly decoupled system where UI, game logic, and scene management can all respond to state changes without direct dependencies.
Scene Management
The real power of this architecture lies in the scene driver component, which provides complete control over how scenes are loaded and unloaded in response to state changes.
SceneDriver: The Heart of Scene Management
This component is arguably the most crucial part of the entire system. It listens to state OnEnter/OnExit events and manages scene loading/unloading with configurable behaviors per state. What makes it especially powerful is the ability to define, on a per-state basis, whether a scene should replace the current scene entirely or be loaded additively alongside it.
[System.Serializable]
public struct AddressableSceneMapping
{
    public State state;           // ScriptableObject state
    public AssetReference sceneReference;  // Scene asset
    public bool additive;       // Load additively if true
}

public class AddressableSceneDriver : MonoBehaviour
{
    public StateMachine stateMachine;
    public List<AddressableSceneMapping> mappings = new List<AddressableSceneMapping>();
    private Dictionary<State, AsyncOperationHandle<SceneInstance>> handles =
        new Dictionary<State, AsyncOperationHandle<SceneInstance>>();

    private void OnEnable()
    {
        foreach (var m in mappings)
        {
            var mapping = m; // capture for closure
            UnityAction onEnter = () => {
                if (!mapping.additive)
                {
                    // Unload all previously loaded additive scenes
                    foreach (var kv in handles)
                    {
                        Addressables.UnloadSceneAsync(kv.Value, true);
                    }
                    handles.Clear();
                    // Load this scene in single mode (auto-unloads non-persistent scenes)
                    mapping.sceneReference.LoadSceneAsync(LoadSceneMode.Single);
                }
                else
                {
                    // Additive load: stack on top of existing
                    var handle = mapping.sceneReference.LoadSceneAsync(LoadSceneMode.Additive);
                    handles[mapping.state] = handle;
                }
            };

            UnityAction onExit = () => {
                if (mapping.additive && handles.TryGetValue(mapping.state, out var h))
                {
                    Addressables.UnloadSceneAsync(h, true);
                    handles.Remove(mapping.state);
                }
            };

            mapping.state.OnEnter.AddListener(onEnter);
            mapping.state.OnExit.AddListener(onExit);
        }
    }
}
Implementation Note: The scene driver tracks handles to additive scenes in a dictionary, ensuring they can be properly unloaded when no longer needed. This prevents memory leaks and scene conflicts while allowing great flexibility in how scenes are combined.
Editor Extensions
To complete the architecture, I've implemented several custom editor extensions that make working with the state machine intuitive and provide excellent debugging capabilities.
Custom Inspectors
I created specialized editor tools for each component of the system to provide better visualization, debugging, and configuration options.
using UnityEditor;
using UnityEngine;
using System.Reflection;
using System.Collections.Generic;

[CustomEditor(typeof(StateMachine))]
public class StateMachineEditor : Editor
{
    private FieldInfo currentStateField;

    private void OnEnable()
    {
        // Grab the private 'currentState' field
        currentStateField = typeof(StateMachine).GetField("currentState", BindingFlags.NonPublic | BindingFlags.Instance);
    }

    public override void OnInspectorGUI()
    {
        // Draw default fields (initialState, etc.)
        DrawDefaultInspector();
        EditorGUILayout.Space();

        // Show the active state
        if (Application.isPlaying)
        {
            var sm = (StateMachine)target;
            var state = currentStateField?.GetValue(sm) as State;
            EditorGUILayout.LabelField("Current State:", state != null ? state.name : "None", EditorStyles.boldLabel);

            // If we have a current state, list its transitions as buttons
            if (state != null)
            {
                EditorGUILayout.Space();
                EditorGUILayout.LabelField("Available Triggers:", EditorStyles.boldLabel);

                foreach (var transition in state.transitions)
                {
                    var ev = transition.triggerEvent;
                    // reflect listener count
                    int count = 0;
                    var listenersField = typeof(GameEvent).GetField("listeners", BindingFlags.NonPublic | BindingFlags.Instance);
                    if (listenersField != null)
                    {
                        var list = listenersField.GetValue(ev) as IList<System.Action>;
                        count = list?.Count ?? 0;
                    }
                    // disable if no listeners
                    EditorGUI.BeginDisabledGroup(count == 0);
                    if (GUILayout.Button($"{ev.name} ({count})"))
                    {
                        ev.Raise();
                    }
                    EditorGUI.EndDisabledGroup();
                }
            }
        }
        else
        {
            EditorGUILayout.HelpBox("Play the scene to inspect and fire triggers on the current state.", MessageType.Info);
        }
    }
}
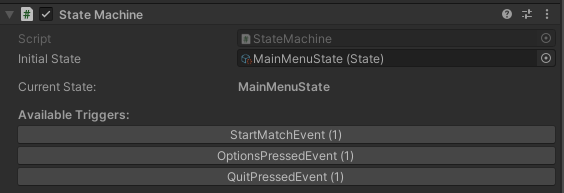
The State Machine Editor showing the current state and available transitions during play mode.
#if UNITY_EDITOR
using UnityEditor;
using UnityEditor.AddressableAssets;
using UnityEditor.AddressableAssets.Settings;
using System.IO;
using System.Linq;
using UnityEngine;

[CustomEditor(typeof(AddressableSceneDriver))]
public class AddressableSceneDriverEditor : Editor
{
    private SerializedProperty stateMachineProp;
    private SerializedProperty mappingsProp;

    private void OnEnable()
    {
        stateMachineProp = serializedObject.FindProperty("stateMachine");
        mappingsProp = serializedObject.FindProperty("mappings");
    }

    public override void OnInspectorGUI()
    {
        serializedObject.Update();

        // Draw core fields
        EditorGUILayout.PropertyField(stateMachineProp);
        EditorGUILayout.PropertyField(mappingsProp, true);
        EditorGUILayout.Space();

        // Show last Addressables build info
        var settings = AddressableAssetSettingsDefaultObject.Settings;
        if (settings != null)
        {
            var profileId = settings.activeProfileId;
            var buildPath = settings.profileSettings.EvaluateString(profileId, AddressableAssetSettings.kLocalBuildPath);
            var fullPath = Path.GetFullPath(Path.Combine(Application.dataPath, "..", buildPath));

            if (Directory.Exists(fullPath))
            {
                var jsons = Directory.GetFiles(fullPath, "*.json");
                if (jsons.Length > 0)
                {
                    var latest = jsons.OrderBy(f => File.GetLastWriteTime(f)).Last();
                    EditorGUILayout.HelpBox(
                        $"Addressables catalog found at:\n{fullPath}\nLast build: {File.GetLastWriteTime(latest)}", MessageType.Info);
                }
                else
                {
                    EditorGUILayout.HelpBox($"No Addressables catalog JSON in:{fullPath}", MessageType.Warning);
                }
                if (GUILayout.Button("Open Addressables Build Folder"))
                {
                    EditorUtility.RevealInFinder(fullPath);
                }
            }
            else
            {
                EditorGUILayout.HelpBox($"Addressables build folder missing:\n{fullPath}", MessageType.Warning);
            }
        }
        else
        {
            EditorGUILayout.HelpBox("AddressableAssetSettings not found.", MessageType.Error);
        }

        serializedObject.ApplyModifiedProperties();
    }
}
#endif
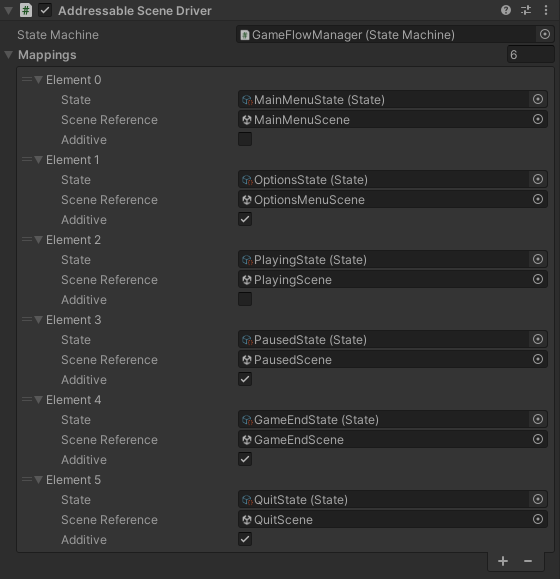
The Addressable Scene Driver Editor showing how states map to scenes with configurable loading modes (additive or replacement).
using UnityEditor;
using UnityEditorInternal;
using UnityEngine;

[CustomEditor(typeof(State))]
public class StateEditor : Editor
{
    private ReorderableList transitionsList;

    private void OnEnable()
    {
        transitionsList = new ReorderableList(serializedObject,
            serializedObject.FindProperty("transitions"),
            true, true, true, true);

        transitionsList.drawHeaderCallback = rect =>
            EditorGUI.LabelField(rect, "State Transitions (Event -> Next State)");

        transitionsList.drawElementCallback = (rect, index, isActive, isFocused) => {
            var element = transitionsList.serializedProperty.GetArrayElementAtIndex(index);
            var eventProp = element.FindPropertyRelative("triggerEvent");
            var stateProp = element.FindPropertyRelative("nextState");
            float half = rect.width / 2;
            const float pad = 4f;

            EditorGUI.PropertyField(
                new Rect(rect.x, rect.y + 2, half - pad, EditorGUIUtility.singleLineHeight),
                eventProp, GUIContent.none);
            EditorGUI.PropertyField(
                new Rect(rect.x + half + pad, rect.y + 2, half - pad, EditorGUIUtility.singleLineHeight),
                stateProp, GUIContent.none);
        };
    }

    public override void OnInspectorGUI()
    {
        serializedObject.Update();

        EditorGUILayout.PropertyField(serializedObject.FindProperty("OnEnter"));
        EditorGUILayout.PropertyField(serializedObject.FindProperty("OnExit"));
        GUILayout.Space(8);
        transitionsList.DoLayoutList();

        serializedObject.ApplyModifiedProperties();
    }
}
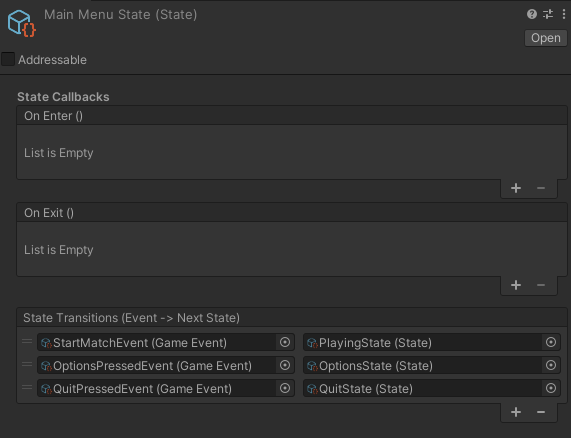
The custom State Editor showing the transition list with drag-and-drop reordering.
These tools provide several key features:
- Live visualization of the current state
- Ability to trigger state transitions directly from the inspector
- Display of event listener counts to help debug transition issues
- Streamlined state configuration with a custom transition editor
- Scene mapping validation to catch configuration errors early
System Benefits
This architecture provides numerous benefits for game development:
Designer Empowerment
- Complete control over game flow without writing a single line of code
- Visual configuration of state transitions through the inspector
- Ability to create, modify, and connect new game states without programming
- Designers can map states to scenes and control scene loading behavior
- Drag-and-drop connection of UI elements to game events
Technical Benefits
- Complete decoupling of UI, logic, and scene management
- Optimized memory usage through configurable scene loading
- Clean persistence of state between scene transitions
- Separation of concerns keeps code maintainable
Flexibility
- Support for both scene replacement and additive scene loading
- Easy to extend without modifying existing code
- Adaptable to various game types and structures
- Clean integration with Unity's scene management system
- Scales well from simple to complex game flows
Next Steps
With the State Machine and Game Flow successfully prototyped and initial tests validating the concept, the next step is to kick off the Week 1 activities outlined in the project proposal:
- Set up a Unity project with a structured, versioned folder hierarchy
- Initialize the GitHub repository and enable Git LFS for Unity assets
- Organize the Kanban board with sprint columns and core tasks
- Create scaffolds for key design documents, including the MVP checklist, coding conventions, and asset pipeline
These boilerplate tasks will establish a solid framework for keeping the project on track throughout development.
Design Philosophy
This system is built to empower game designers to focus on designing without needing to dive into the code. By separating concerns between programming and design, the architecture ensures that both teams can work in parallel without bottlenecks. Designers can iterate on game flow and mechanics freely, while programmers maintain clean, scalable systems. This approach prevents ad-hoc solutions and keeps the project moving smoothly, with each team contributing their expertise where it matters most.